CCNP SWITCH (retake)

Well one more update. I have just checked my email and it seems that CISCO have responded to my comments about the SWITCH exam, and provided me with a re-sit voucher!

I think this says something about the quality of this exam as this is the second voucher I have received. The first was after the exam crashed on me. So hats of to CISCO for that. But this time no excuses, I still don’t think the course material if fit for its purpose, and does not really prepare you for the exam. But having sat it twice, I can’t claim I don’t know the focus, or where my weaknesses lay.

So my intention is to start my new job, get hold of some lab equipment and do some hard studying on the topics I need to. Then I think I should be able to pass this no problem. I did notice the First chapter of the ROUTE foundation seems to cover some of the planning topics nicely so I might flick through it a little more to see if there are any other relevant bits.

DevilWAH

Applying a configuration to a CISCO device using xmodem.

Last week at work now, so been rushing to get things sorted out. I have still been doing a bit of study and planing some more ROUTE posts, but with a broken down car and house sale looking like its falling through haven’t had time to do any actually real posting.

However I came across something today, that I have known about for a while but never really used much. One of the things every one seems to love about CISCO is the fact you can simple copy and past configurations in to the terminal emulator window.  And this is indeed great. set up one interface, copy the config to notepad, update it as you wish and past it back in… A real time saver and why we all love CISCO more than Microsoft ;).

In the past this is also how I have always copied backed up configurations on to a new switch/router. Simply open the saved config in notepad. Ctrl-A to select it all, copy and paste to the device. However I was doing this today and hit an issues. With really large configuration files (500+ lines of configuration), I was watching the console windows and could see it was skipping some of the configuration when doing this connected through the serial port. I could see that while things like VLAN’s where being created and the device was pausing, the following lines would some times get lost or corrupted. Now while if you only have a small size configuration file this is not an issue as it is quite easy to check, hundreds of lines become very hard to validate.

I found the best way around this problem was to set up the device with an IP address, put it on a limited access network that has a TFTP sever and copy over the configuration file, either to the startup-config or running-config. This works fine but it is a bit of a hassle going to all that trouble and it means you have to connect the switch to the network, so you have to be very careful with things like VTP and spanning tree. What I really wanted was a way to send the configuration file through the console port.

This made me think of how to recover a corrupted IOS image (which you can fine in the tips and tricks link above). Where boot the device in to ROMmon mode, and then copy the IOS over using the xmodem protocol. Almost all the mainstream terminual emulators have this built in, and while for recovering the IOS you need to increase  the baud speed of the console port to speed up the copying process, as the configuration file is only 20-30kb max for most people, the standard speed will move that across in a few seconds.

So then it is just a case of knowing the command to achieve the goal, and I was happy to see it is as simple as it should be. On the device simple type the following from the enable prompt.

router#copy xmodem: startup-config

That’s it, no file names or anything, the device will now wait to receive the file(if you do not start the transfer within a few minutes the device will time out waiting). Then in your terminal emulation program start the transfer. In teraterm it is under the file menu, while secure CRT has a whole menu structure dedicated to various methods to transfer files. Simple chose the xmodem protocol (I found selecting the 1K option was more reliable), and browse to the configuration file, and away it goes. A few moments later the configuration will be on the device (#show Flash: to confirm), and a reboot will have it all up and running.

To me this is a far more reliable way of copying large configurations across, and allows you to easily set up the device from any client, this can be very useful if you are out on site and don’t have access to a limited access network, or the TFTP server to use to copy the files via TFTP or FTP using the network.

DevilWAH.

PS. Some older routers don’t seem to like you copying from xmodem to nvram, or require you to give a source file name. But you can still achieve the same by copying the file to Flash: .

PPS. Although I prefer the xmodem method, you can improve the reliability of the copy/paste method by increasing the line/character delay in you terminal emulation program. A 5msec delay per character seems to help, although with a 1000+ lines of configuration you may get from a complex configuration, you may find the paste takes a little time, and you may still get errors.

CCNP ROUTE (Part 8 EIGRP Simple Lab)

I decided that rather than just use other people labs I would come up with a few of my own, the following lab is very simple, requiring the enabling of EIGRP on two routers so they form a neighbour relation ship, and setting up which routes will be advertised. Followed by some simple summarization to reduce the size of the routing tables.

You can find the GNS 3 topology files HERE, these also contain the finalised configs if you want to see the method and commands used. (note you will need a 2691 image installed)

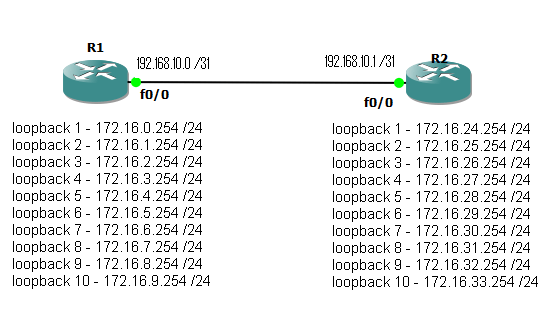
Fig 1

To start with we have two routers connected via a point to point link on interface Fastethernet 0/0. Each also has 10 loop back interfaces configured with various /24 networks configured.

The aim is simple, enable EIGRP with an AS number of 10, form a neighbour relationship between the two routers and update the routing tables so both routers can see / reach all configured networks. Ideal use as few network statements as possible, while remaining as specific as possible as to what networks get advertised. Autosmmorization should also be disabled.

After completing this, a #show ip route, should display something like this.

router1#sh ip route
Codes: C - connected, S - static, R - RIP, M - mobile, B - BGP
D - EIGRP, EX - EIGRP external, O - OSPF, IA - OSPF inter area
N1 - OSPF NSSA external type 1, N2 - OSPF NSSA external type 2
E1 - OSPF external type 1, E2 - OSPF external type 2
i - IS-IS, su - IS-IS summary, L1 - IS-IS level-1, L2 - IS-IS level-2
ia - IS-IS inter area, * - candidate default, U - per-user static route
o - ODR, P - periodic downloaded static route

Gateway of last resort is not set

192.168.10.0/31 is subnetted, 1 subnets
C       192.168.10.0 is directly connected, FastEthernet0/0
172.16.0.0/24 is subnetted, 20 subnets
D       172.16.32.0 [90/409600] via 192.168.10.1, 00:01:01, FastEthernet0/0
D       172.16.33.0 [90/409600] via 192.168.10.1, 00:01:01, FastEthernet0/0
D       172.16.28.0 [90/409600] via 192.168.10.1, 00:01:01, FastEthernet0/0
D       172.16.29.0 [90/409600] via 192.168.10.1, 00:01:01, FastEthernet0/0
D       172.16.30.0 [90/409600] via 192.168.10.1, 00:01:01, FastEthernet0/0
D       172.16.31.0 [90/409600] via 192.168.10.1, 00:01:01, FastEthernet0/0
D       172.16.24.0 [90/409600] via 192.168.10.1, 00:01:01, FastEthernet0/0
D       172.16.25.0 [90/409600] via 192.168.10.1, 00:01:01, FastEthernet0/0
D       172.16.26.0 [90/409600] via 192.168.10.1, 00:01:01, FastEthernet0/0
D       172.16.27.0 [90/409600] via 192.168.10.1, 00:01:01, FastEthernet0/0
C       172.16.8.0 is directly connected, Loopback9
C       172.16.9.0 is directly connected, Loopback10
C       172.16.4.0 is directly connected, Loopback5
C       172.16.5.0 is directly connected, Loopback6
C       172.16.6.0 is directly connected, Loopback7
C       172.16.7.0 is directly connected, Loopback8
C       172.16.0.0 is directly connected, Loopback1
C       172.16.1.0 is directly connected, Loopback2
C       172.16.2.0 is directly connected, Loopback3
C       172.16.3.0 is directly connected, Loopback4

Now to reduce the size of the routing table we can manually summarise the routes. This is carried out under the interface that is sending out the update (in this case it will be fast ethernet 0/0 on each router). Again we want to be as specific as possible. The completed LAB uses multiply summarization statements , this increase the specificity of the summarization at the expense of adding an extra route in to the table. The routing table should now look something like.

router2#sh ip route
Codes: C - connected, S - static, R - RIP, M - mobile, B - BGP
D - EIGRP, EX - EIGRP external, O - OSPF, IA - OSPF inter area
N1 - OSPF NSSA external type 1, N2 - OSPF NSSA external type 2
E1 - OSPF external type 1, E2 - OSPF external type 2
i - IS-IS, su - IS-IS summary, L1 - IS-IS level-1, L2 - IS-IS level-2
ia - IS-IS inter area, * - candidate default, U - per-user static route
o - ODR, P - periodic downloaded static route

Gateway of last resort is not set

 192.168.10.0/31 is subnetted, 1 subnets
C       192.168.10.0 is directly connected, FastEthernet0/0
172.16.0.0/16 is variably subnetted, 15 subnets, 2 masks
C       172.16.32.0/24 is directly connected, Loopback9
D       172.16.32.0/21 is a summary, 00:02:27, Null0
C       172.16.33.0/24 is directly connected, Loopback10
C       172.16.28.0/24 is directly connected, Loopback5
C       172.16.29.0/24 is directly connected, Loopback6
C       172.16.30.0/24 is directly connected, Loopback7
C       172.16.31.0/24 is directly connected, Loopback8
C       172.16.24.0/24 is directly connected, Loopback1
D       172.16.24.0/21 is a summary, 00:02:28, Null0
C       172.16.25.0/24 is directly connected, Loopback2
C       172.16.26.0/24 is directly connected, Loopback3
C       172.16.27.0/24 is directly connected, Loopback4
D       172.16.8.0/24 [90/409600] via 192.168.10.0, 00:02:26, FastEthernet0/0
D       172.16.9.0/24 [90/409600] via 192.168.10.0, 00:02:26, FastEthernet0/0
D       172.16.0.0/21 [90/409600] via 192.168.10.0, 00:02:26, FastEthernet0/0

So the routes from Router 1 are now summarized in to 3 blocks. 172.16.0.0/21 which would include the first 8 networks, plus the 172.16.8.0 and 172.16.9.0 /24 which fall out side the summarization.

Note also the routes to null that have been entered. When you set up a summarization, the router will automatically set up a route to null for that network. The reason for this is that you many not actually have routes to all the subnets for the network you have advertised as a summary. Imagen in the above case there was no loop back 5 and 6 on router 2, so no networks 172.16.28.0 and 172.16.29.0 /24. But the router is still advertising a summary address that includes them. When packet arrive at the router they are routed based on the most specific match. so a packet coming in with a destination address of 172.16.27.59 will match both the following routes.

D 172.16.24.0/21 is a summary, 00:02:28, Null0
C 172.16.26.0/24 is directly connected, Loopback

but because /24 is more specific than /21 the route to the loop back interface will be used. However if there is no more specific route, then the null route will be matched and the packets discarded.

OK I said it was simple and it is. The topology files have both the starting position and my completed example. This is of course not the only solution. You can argue there are neater ways to do it, but I chose to use multiply statements to show how specific networks can be picked and what happens when summary address do not exactly match the networks that are configured.

There will be one more EIGRP Lab coming up that will be more involved and included redistribution of static routes and manual formation on neighbours.

DevilWAH

CCNP ROUTE (Part 7 EIGRP General commands)

OK so been reading the intro to EIGRP, now its time to get configuring,  I think the best way to remember these is to take each one in turn and describe its function. Starting with the global commands, then the EIGRP specific commands, followed by some of the interface commands, and ending with a few basic verification commands. (For this post the configured name of the router will be “R1”)

GLOBAL COMMANDS.

R1(config)#ip routing.

This command is enabled by default on routers and disabled on layer 3 switches (some newer IOS do seem to have it enabled). Running this command enables routing on the device, with out it no routing of any kind will be preformed by the switch.

R1(config)#ip route <ip address> <subnet mask> <next hop address>

This command set a static route entry, not strictly EIGRP but important enough to know to be here. The next hop address can by an ip address to forward the traffic to, or jsut the interface to send the traffic out. It is considered best practice to if possible specify an ip address if possible. One common route entered this way is the “default route”

R1(config)#ip route 0.0.0.0 0.0.0.0 &lt;next hop address / interface&gt;

This sets the destination to pass all unknown traffic to, traffic that there is no specific entry in the routing table for.

R1(config)#router eigrp <AS number>

Enters into the eigrp configuration mode for the stated AS number, all routers running eigrp that are so share routing table/information, must be running the same AS number. If this is different then routers will not form neighbour relationships.

R1(config)#router eigrp 10

EIGRP CONFIGURATION MODE

R1(config-router)#auto-summary

By default this command is set to be enabled (although I believe in IOS version 15 is is now defaulted to “no auto-summery”). Having it enabled will cause EIGRP to automatically summarise all routes to their class full boundaries. Most people will want to diable this to give more control and manage summarization manually.

R1(config-router)#network <ip address> <wildcard mask>

This command has two separate effects. First it will enable the sending of routing update out of any interface that matches the address and wild card mask. Secondly it will advertise the networks that those interfaces have assigned to them. if for example you have the interface with the following ip address and subnet mask assigned. 192.168.5.254 255.255.255.0. and you add the eigrp network command.

R1(config-router)#192.168.5.254 255.255.255.255 (only the single ip address)

eigrp will send out updates on that interface, but these will included the advertised route 192.168.5.0 / 24, as this is the network subnet assigned to the interface.

R1(config-router)#Passive interface <int ID / Default>

Image you run the last command (network x.x.x.x y.y.y.y) on  the IP range for an interface that is connected to an end users network, with no other routers to form neighbours with? In this case you most likley do not want to send out routing updates but you still wish to advertise the network. In this case you can run the passive interface command to prevent multicast hello and update messages getting sent out.

R1(config-router)#neighbour <IP address> <interface ID>

Now Imagen you have run the passive interface command, but you wish to still send and receive updates from and two specific routers out of that interface? Using the neighbour command allows you to do this. In fact setting a neighbour in this method effectively turns the interface in to a passive interface by changing the hello messages from using the multicast address, to using unicast addresses.

INTERFACE CONFIGURATION MODE.

R1(config-if)#ip summary-address eigrp <AS num> <ip> <subnet mask>

If you have disabled auto-summary in the eigrp config mode, you may still want to do manual summarization. Configured under an interface, this command will summarize all routes that are advertised out that interface and that fall in to the summary network specified in to a single routing advertisment. Multiply summary address can be configured per interface, to cover multiply summary routes.

OK so that’s some of the eigrp commands to get started with. There are of course many more but using these it is possible to enable eigrp, configure the networks to be advertised (and what interfaces to advertise them on), and form neighbour relationships that will populate the routers routing table. So then the questions becomes how do we tell if it is all working

VERIFY COMMANDS

R1#show ip route

This will display the current routing table that has been populated by all routing protocols running, plus static routes and connected networks, that is used by the router to make decisions on the actually forwarding of data packets.

R1#show ip eigrp neighbours

Displays details about the neighbours EIGRP knows about. (neighbour table)

R1#Show ip eigrp topology

Show details of all networks that EIGRP has learnt about, details of how to reach them and what neighbours have advertised them. things like which one is the successor and feasible successors are shown here. This is a display of the topology table.

Now this table is not complete, so look out for part 2 to this table for when we get on to redistribution and more complex EIGRP setups.

DevilWAH

CCNP ROUTE (Part 6 EIGRP Terminology in Diagrams)

Well after last post I thought it would be good to get together some simple diagrams to help explain the different terms and how they are use in EIGRP.

So to start with lets look at the difference between the Feasible distance and the advertised distance.

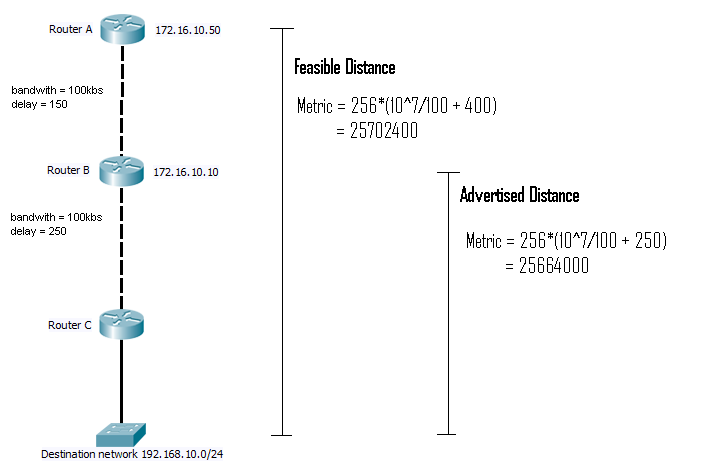
Fig 1

We are assuming that we are router A in this set up looking to reach the destination network 192.168.10.0/24. When router B sends it update packet to router A it will contain an entry for this destination network, this will include the bandwidth, delay, reliability and load values along with the MTU (100kb and 250) delay for router B’s downstream link. Router A will then computer the metric from these, This will be the advertised distance. Router A will then add on any additional values from it’s link to the neighbour and recompute the metric, this will become the Feasible distance.

These two values are used for determining the best path to the destination network, and also for deciding if a router should be considered a valid back up route to a network. So lets add some more routers.

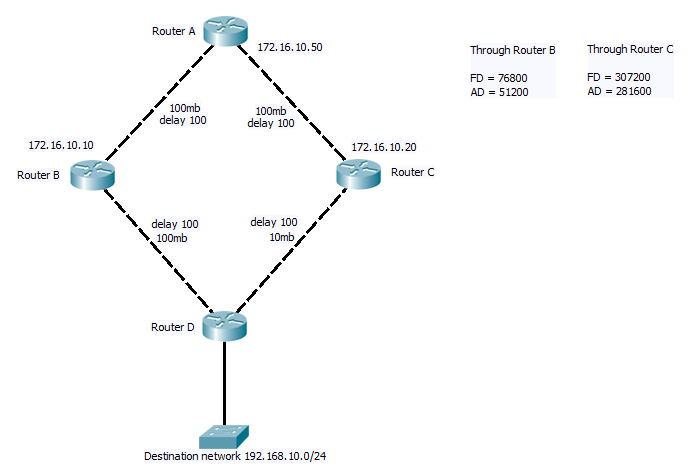
Fig 2

So now there are two paths, and the EIGRP needs to determine which one to use. Just like you would expect from any routing protocol when DUAL runs it will pick the route with the lowest Feasible Distance and assign this route as the Successor. So in the example above the Feasible distance (FD) going through router B is 76800, so this route becomes the Successor. Each alternate route is then examined and the Advertised Distance (AD) for each is compared to the FD of the Successor route (76800). If the AD of the alternative is less than the FD of the Successor, the route is added as a Feasible Successor (FS). This means it can be made the active route if the Successor fails, with out any need for re-computation. If the AD is grater than the FD then the route will be ignored. This simple little formula insures there can be no loops in the routes. However as we can see in this case it can also rule out valid redundant links, here the route through C would not be added as a FS.

Rather than an instant fail over, now if router B fails, router A will have to send a query out to router C, wait for the reply to return and re-computer through DUAL.

Hopefully this post helps make clear exactly how EIGRP determines the best routes and how it acts in the event of topology changes. I also hope it shows how it takes the best parts of the distant vector protocols, borrows some things from link state, to achieve a low overhead, fast and efficient solution.

DevilWAH

CCNP ROUTE (Part 5 EIGRP Terminology)

Rather than dive straight in to configuring EIGRP, I thought it would be nice to cover some of the terminology and some of the basic commands for setting it up with a little explication on what exactly they do. I have not decided if I will actually at any point include my labs on this site, as from experience I know there are some great labs around already. But what ever happens, I will either add my own or make sure there are links to some of the good ones I have come across in the course materials.

Termonology

DUAL, This is the EIGRP algorthem that runs to determine what routes are used by traffic.

Autonomous System (AS), all EIGRP routers that are to share the same routing topology, must be running in the same AS, we will cover setting this up later in the post.

Neighbour, a neighbour is a router that can be reached through a network segment that is running the same EIGRP AS and is directly sharing routing information with the local router.

Successor, the neighbouring router with the best cost path too a destination network, will be marked as the successor for that network and will be used as the next hop to forward traffic to it.

Feasible Successor, Other routers that also have a path to the same destination as the successor will be marked as Feasible Successors and used in the event of the primary successor failing. For a router to be considered a feasible successor the advertised distance to the destination, must be less than the feasible distance of the successor. (don’t worry I will come back to this with a digram later)

Feasible distance, this is the total cost to reach a destination network, it includes the cost of the link to the neighbour who is advertising the link.

Advertised Distances, this is the cost of reaching a destination network as advertised by the neighbouring router, or to look at it another way, it is the feasible distance minus the cost of the link to the neighbour.

Neighbour Table, contains a list of the neighbouring routers and information about them.

Topology Table, contains a list of all the known destination networks along with what neighbours are advertising them and there costs among other information.

Routing Table, once DUAL has run against the Topology table, it picks the best routes and adds them in to the routing table. It is this table that is used for actual routing discussions for data packets.

Metric, the metric is used when determining the best path to a destination network. It is worked out from a formula that included, Delay, Bandwidth, Reliability and Load.

Metric = 256*([K1*Bw + K2*Bw/(256-Load) + K3*Delay]*[K5/(Reliability + K4)])

with default settings K1 and K3 are set to = 1 and K2, K4 and K5 = 0 and this reduces the formmular to metric = 256*(Bw + Delay), where Bw is 10^7  divided by the bandwidth in kb/s (bandwidth is taken as the minimum along the path), and delay is the sum of the delay on each hop of the path in 10’s of microseconds, be-aware delay on show interface is shown in microseconds so needs to be divided by 10.

Note that the MTU is also sent as part of the metric, however it is not used for the purpose of finding the best route but is tracked so the routers know end to end the max MTU that can be used.

OK this post is getting longer than I expected, so rather than carry on with the configuration, I think I will get together a digram to help visualise some of these terms. So look out for part 6 coming your way in the near future

DevilWAH

CCNP ROUTE (Part 4 EIGRP Intro)

Before getting in to the configuration of EIGRP, its worth knowing some of the fundamental workings of the protocol, why and from where it was developed and how it differs from the other protocols in offer.

The first thing to note about EIGRP is that it is a CISCO propriety protocol. So no matter how great it is, unless you have 100% kit, and you company allows non-standardised protocols to be used (many government organisation for example will not allow its use), then you will be unable to implement. But lets assume you do have 100% CISCO and your company allows EIGRP, should you use it?

EIGRP was CISCO’s a step along from IGRP,  while IGRP was developed by CISCO as the step up from RIP. All are distant vector protocols where each routers receives a list of destination networks from each of its neighbouring routers, along with the cost to reach these networks. And from this information build a routing table that is used to route data packets by selecting the paths with the lowest cost to each destination.

EIGRP has several advantages on IGRP. First routes can be summarised at any interface on any router in the Autonomous system (more on AS’s in later posts), making it very flexible and truly a classless routing protocol. Secondly EIGRP runs DUAL ( Diffusing Update Algorithm ), Unlike most other routing protocols EIGRP learns not only the best path to a destination network but also any backup routes. So if there is a topology change, and a backup route exists it can be determined and activated in a very short space of time (milliseconds). Running DUAL also results in much lower processor overheads during topology changes and allows for not only load balancing across equal links, but also across unequal links (the only protocol to allow this). CISCO label EIGRP as an advanced distant vector protocol, as it benefits from many things found in link state protocols (loop free), while retaining the speed and simplicity of distant vector. It is also very simple to configure. Should you use it or not is a personal choice, however many of the networking experts in the field will agree with CISCO and confirm it is a very solid and efficient protocol to use.

EIGRP relies on 4 major components.

  1. Neighbour discovery and recovery.
  2. Reliability of transport of EIGRP management traffic.
  3. The DUAL finate state machine.
  4. The Protocol dependent model.

For neighbour discovery, Each router sends out periodic hello messages, when other routers receive these they check for compatibility and then reply. Once the neighbour relationship is formed updates containing routing data can be sent. One the initial updates have been exchanged and each router has the routing tables from its neighbour, the only updates that will be sent are for changed in topology. Other wise only hello messages are sent to determine the status of the relationship.

To keep traffic overheads down, EIGRP only uses reliable transport when needed. For example Hello messages may be sent as multicast with out reliability. Where as updates are sent as unicast with reliability. If it is to be used or not is determined by the originator requesting it in the packet.

DUAL finite state machine. When DUAL is run on the neighbourhood table and Topology table (more about them later), it will pick the best cost path and add this to the routing table as the successor route. All other routes will be checked to see iof they match the requirements to be a Feasible successor, if so they will be marked as such. In the case of the successor failing, DUAL will pick the next best Feasible successor and add that to the routing table. This requires no re computation, if no Feasible successor can be found then it will query the neighbouring routers for the route.

The Protocol dependent module deals with network layer protocol specific requirements. EIGRP can route multiple protocols, it is the IP-EIGRP module that is responsible for IP routing.

EIGRP Tables.

There are 2 tables that are specific to EIGRP, the “neighbour table” and the “topology table”.

The Neighbour table contains a list of every neighbour that the router knows about, along with details of things like, address, interface, hold time, sequence numbers, and round trip times.

The topology table contains a list of all the learnt destination address, and for each router that has advertised the network, the advertised distant for the path, plus feasible distant, as well as the next hop router address. (It is worth noting that routers will only advertised links in actually use to an upstream router, feasible successors are not advertised if they are not involved in forwarding traffic)

DUAL runs on these two tables to form entries to the IP routing table that is used to forward data packets.

EIGRP Packet types.

  • HELLO/ACK’s
  • Updates
  • Queries
  • Reply
  • Requests

Hello’s are sent generally as multicast, in an unreliably manor, the ACK (which is an empty hello message) is sent as unicast to the originator.

Updates that contain route information are usually sent as unicast, however updates that only contain link cost changes can be sent as multicast. Which ever method they are sent using the reliable method.

Queries are sent when a router loses the link to a destination and does now have a feasible successor in there topology, they will then queries all there connected neighbours to see if they have a path. Neighbours will reply is they have a successor to the destination, or if not will pass on the request to there neighbours.  Queries are multi-case replys unicast, both are treated as reliable traffic.

Requests are sent to nebighour routers to request specifice information (route server applications), they can be both multi-cast or unicast and are always set as unreliable.

Route tagging and Route states.

EIGRP is aware of internal and external routes, routes can be tagged to allow passing of information between EIGRP AS’s or when redistribution occurs between different routing protocols. (we will come back to tagging later) This allows from more controlled policy based routing.

Routes in EIGRP can be in one of two states. Passive which is good and means a route is stable in the topology. and Active when the router is forming a re-computation on the route. This would happen where there is no feasible successor and the router is having to query neighbouring routers. Ideally routes should almost never be in the active state.

Further reading

Eigrp intro cisco

Internetworking Technology Handbook EIGRP

Next time we will explore some of the terminology of EIGRP before running through the more common configuration and verification commands.

DevilWAH

CCNP ROUTE (Part 3 Route Protocol Types)

Although there are various routing protocols around such as RIP, OSPF, IS-IS, EIGRP and BGP. They all fall in to one of two groups, either the call of routing protocols labelled Link-state, or those labelled Distant-Vector.

The fundamental difference is that a Link-State route builds up a complete topology map of all the routers in its network segment, and how they are all linked together.  This map is built up be each router sending its own topology to every other router in its segment. This is achieved by each router sending its topology to its connected neighbour, these then check if it is newer than the current stored, and if so add it to there own topology and then forward it out to there neighbours, this way every router in the segment will receive the update. The routers then combines all the received individual topologies to create an over all map of the network. An algorithm is then run on this map by each router to determine the best paths to all the destination  networks advertised and these are added to the routing table that will be used to forward traffic. If an update is received that causes a change to the map topology then the algorithm has to be re-run to update the tables. If two routers in the segment send conflicting information about a link (eg Router A reports a link to route B but Router B does not report this link. Then when Router C receive the topology’s from A and B it will not add this possible link to its topology).

Distant-Vector protocols work in a different way. Rather than know the entire topology of the network segment. Routers only advertise if they can reach a network and the cost to reach it. Generally this cost will be higher for links that are slow and have multiply hops. and low for higher bandwidth links with less hops. Each router will updates its neighbours with the list of networks it can reach and how much it cost to reach each one. The receiving router will  place all this information, from all its neighbours in to a table and pick out (by default) the route with the best cost to each destination network to add to the routing table.

So which is best then?

Well they both have there strengths and weaknesses.

Re-convergence speed after a topology change would generally go to Link-state, most distant-vector protocols don’t remember the back up links so have to relearn them becfore they can forward data again. A link-state know the entire topology, so when a link fails it can re-run the algorithm to find a new best path.

However resources wise Link-state are very costly, to keep the topology map in memory and to run the algorithm across it means high CPU and memory usage. This means they don’t scale well to very large network, CISCO recommend a maximum of 90-100 routers and 200 subnets in a single OSPF area. More than this and the size of the topology map and time need to run the algorithm could slow the routers to a crawl. On the other hand Distant-vector do scale much better, routers only communicate with there direct neighbour and only need to know the destination network address, next-hop and cost. This is why you will find Distant-vector used for the internet backbone routers that need to deal with large routing tables and constant topology changes, while you find the link-state protocols inside company networks.

One more advantage link-state has over distant-vector is that due to the fact it has a complete topology there is little danger of loops. While for distant-vector this is a very real problem and one that needs checks to be introduce to insure against.

So the chose of what one to to use really does very much depend on the situation. In every day networks there are 5 well known protocols in use

Distant-vector = RIP, EIGRP, BGP

Link-state = OSPF, IS-IS

Of these EIGRP, OSPF and BGP are the most common. BGP is an external protocol (realy the only main stream one) used between the core internet service providers, so as I mentions most of the internet is run using distant-vector. EIGRP is highly optimised distant-vector protocols and has many of the benifits of link-state with out the huge CPU and memory cost, however its main issue is that is it CISCO proprietary so unless you have 100% CISCO devices it is ruled out. Leaving OSPF as the remaining protocol to run in internal networks. For many people in small to medium size networks the benefits gained from running OSPF or EIGRP are small and often come down to personal choice. The consistency and reliability of Link-state or the simplicity and low resources of Distant-vector?

Further Reading

Distance Vector Routing Protocols

Link State Routing Protocols

Well thats the review stuff out of the way, next time we can get in to the workings of EIGRP.

DevilWAH

CCNP ROUTE (Part 2, General Routing)

OK so what is this routing thing all about?

Well it seems to me there are two parts to routing, the actual physical routing of data across networks, and the methods in which the network devices keep track of where these route are (the routing protocols). Although there are several different routing protocols in use, they all have the same basic function, to allow routers to share the information of possible paths through the network between each other. Which in turn allows the indivual routers to build up routing tables which they can then use to look up the destination IP address in a packet and determine the next router (hop) to which the packet must be sent.

So what about this routing table? what does it look like and what does it contain?

router# <strong>show ip route</strong>

171.68.0.0/24 is subnetted, 3 subnets
S       171.68.1.0 [1/0] via 171.68.192.201
S       171.68.16.0 [1/0] via 172.16.191.254
C       171.68.192.0 is directly connected, FastEthernet0/0
172.16.0.0/16 is variably subnetted, 2 subnets, 2 masks
S       172.16.88.0/24 [1/0] via 172.16.191.254
C       172.16.191.252/30 is directly connected, Serial2/0
D    192.168.80.0/24 [90/156160] via 171.68.192.201, 00:00:07, FastEthernet0/0
D    192.168.90.0/24 [90/156160] via 171.68.192.201, 00:00:08, FastEthernet0/0
S   0.0.0.0/0 [1/0] via 10.1.1.3

From this output we can see how the routing table functions. Each network/subnet that the router has learnt about there is an entry telling the router where to send a packet that is destined to that network. This destination can be either the IP address of the next router in the path, or the outgoing interface ID. There is also a priority given to each entry for deciding entry to use if a route is added twice due to multiply paths to the same destination network.

The three methods that can add entries to the routing table are , Connected networks (added automatically), statically added routes, and routes learnt through routing protocols. In terms of default priority’s, Connected bet Static which in turn bet those learnt through protocols (where in general from highest to lowest we have BGP, EIGRP, OSPF, IS-IS and RIP). The last entry in the table above is a special case static entry, often know as the “default route” this route of “0.0.0.0 0.0.0.0” will catch any packet that does not match any other entry in to the routing table and forward it to a next hop address. This is commonly used to route packets destined to the internet, so rather than you company router needing to learn the router to every address on the internet, it only knows about internal company address. Anything else is caught with by the default route and passed to the ISP to deal with. This drastically cuts down the size of routing tables and is what allows the internet to function.

However once added the function is the same, as packets enter the router the destination address will be read and checked against the routing table to determine the next step, and then forward the packet out the destination interface. Now although some routers do build up a “map” of the network segment they are part of, once a router has passed on a packet to an upstream router is has no influence on what then happens to that packet. So it is important that all routers in the path have valid routes, and that failers in the network can be notified to downstream routers, so they can route packets around network issues. This is where the routing protocols come in to the picture!

In an ideal world we would not have to add any static routes, we would simple configure IP address on interfaces, enable routing protocols and the routers would teach each other how to reach all the networks. And in fact in many cases this is how it works. Once the interface are set up, a routing protocol is enabled and you simple have to configure what networks you wish to advertise using this protocol and to what neighbouring routers you wish to send the adverts to. This configuration and exact method may change between the different routing protocols, but fundamentals are the same, what do you want to advertise and who do you want to advertise this to. Of course there is far more to it than simply this, and we cover it in more depth later in course. But for now we just want to get a fundamental picture of the why’s and the how’s of routing.

I know once again this is really a bit of revision from CCNA material, but I think it is good to once in a while return to the basics, if you make sure you are clear in your head about them, then later on they can be built on to form the more complex topics. But no matter how complex things get, these fundamentals of what routing is and why we use routing protocols will always hold true.

In the next episode of CCNP ROUTE we shall be looking in more detail at the two main types of routing protocols (link state and Distance vector), and why we may chose one over the other.

Mean while you may want to take a look at CISCO Routing Basic. As well as this one document I would recommend you add a book mark to the handbook as a whole, there is lots of useful info there.

Off to do a bit more study now. 🙂

DevilWAH

CCNP Route (Part 1, Subnetting Refresh)

OK back from a weekend away with wife and daughter, and before I get in to CCNP can I just say 4 month old babies are hard work. In the end she cried so much for her own bed we came home. Thank fully the beach is only an hours drive away, and as we where going to stay at the family owned bungalow, it just meant we came home and went back again the next day… She can never say I never do any thing for her :). All in all though a lovely weekend, Babies might be hard work but walking on the beach and her face as she saw the waves was great. 🙂 Makes me think I should post some pictures of here some time..

But now back to CCNP ROUTE.

I thought before I get in to the real core parts I would do a quick recap of subnetting, I know this is CCNP and really subnetting should be out the way by the CCNA, but I thought there was no harm in covering it again briefly.

Now in my view although there are many different “quick” methods to make subnetting “easy”, The best way to learn is the long hand method. This will teach you what and how subnetting works. Once you can subnet the long way with out problem, then the “quick” methods will make more sense and become useful. Also the long method out of all of them I think is the most logical and “simple” to learn. So lets go for it.

First you need to know what class of network you are working with. (If you just want to know the number of hosts, network and broadcast address in network when an given IP address a subnetmask then you can ignore this step. This step is important when you need to know the number of possible sub networks you can create or that will be available using a given subnet mask.

I would always start by writing out the class subnet address in binary, so.

CLASS A = 1 1 1 1 1 1 1 1 . 0 0 0 0 0 0 0 0 . 0 0 0 0 0 0 0 0 . 0 0 0 0 0 0 0 0

CLASS A = 1 1 1 1 1 1 1 1 . 1 1 1 1 1 1 1 1 . 0 0 0 0 0 0 0 0 . 0 0 0 0 0 0 0 0

CLASS A = 1 1 1 1 1 1 1 1 . 1 1 1 1 1 1 1 1 . 1 1 1 1 1 1 1 1 . 0 0 0 0 0 0 0 0

For the next steps we can discard any octet that contains only “1’s”, as these can’t change then any subnetting we do can not affect them.

We now need to decided what is important, the number of hosts the subnet or the number of networks we want to create. One very important thing to remember here is that when creating a network with  specific number host IP addresses, some of these are not usable by hosts placed in that subnet. There are the first IP in the range, as this will become the network address, and is used along with the subnet mask to identify a network. Also the last IP address in the range that will become the broadcast address of the network. (It is common practice to state the available hosts address in a given network as the IP address range minus 2).

Let’s start with an easy example by splitting up the Class C network 192.168.10.0 in to 4 equal networks.

To begin with I would always suggest you write out the octet/’s you are interested in with the decimal and binary equivalents. As I said we can ignore the octets that are all 1’s from the class divided so all we need is the last octet. which in this case is all 0’s

Decimal = 128 . 64 . 32 . 16 . 8 . 4 . 2 . 1

Binary    =  0 .   0   .  0 .   0 .  0 . 0 . 0 . 0

As we want 4 subnets we first need to work out what binary number we can use that gives us the closest to 4. The subnet must be a continues run of 1’s,  so either 1, 11, 111, 1111, 11111, 111111, 1111111, 11111111. Remembering binary starts at 0, and converting these we get 2, 4, 8 ,16 ,32, 64, 128, 256. Wanting 4 we can chose the second one from above which is 11.

So now we can put it all together, remembering network bits take the left hand positions and host bits take the right hand positions. And that in the case of subnets, where there is a 1 in the mask the bit in the IP address can’t change and where these is a 0 it can. The next step is to write out the subnet mask and the possible subnets that can go with it. here we will write all 4 octets but as you will see the first 3 will not change due to the class address. Red indicates values come from original Class mask and Blue is the two bits we have borrowed. Fell free to convert 11000000 in to binary to see how we get the 192 for the subnet mask.

Subnet Decimal = 255 . 255 . 255 . 192

Subnet Binary = 11111111.11111111.11111111.110000

IP address Decimal = 192 . 168 . 10 . 0

IP Binary = 11000000 . 10101000 . 00001010 . 00000000

Now a subnet mask of 255 means that non of the octet can change, and the 11000000 will give us four possibilities for the last octet to have.

Network A = 11000000 . 10101000 . 00001010 . 00000000

Network B = 11000000 . 10101000 . 00001010 . 01000000

Network C = 11000000 . 10101000 . 00001010 . 10000000

Network D = 11000000 . 10101000 . 00001010 . 11000000

So taking network C we can convert it back to decimal and pairing it with the new subnet mask we have created we can start working out the range of IP address that will fall in to this network.

Network Binary = 11000000 . 10101000 . 00001010 . 10000000

Subnet binary    = 11111111 . 11111111 . 11111111 . 11000000

Remember where these is a 1 in the subnet the value in the IP address can’t change. So from this we can work out the range. The bottom value is the network address we have just written above with the 4th oct of 10000000, and the top value will be 10111111. Or in decimal 128 to 191.

So all togather we have.

Network address = 192.168.10.128

Subnet mask = 255.255.255.192

Broadcast address – 192.168.10.191

And possible host are address 192.168.10.129 through to 190 which is 62 in total.

And that’s subnetting. All you need to remember is that subnet masks can only be one of 8 vlaues, 128, 192, 224, 240, 248, 252, 254, 255, and must always be borrowed from the left hand side.

If you are trying to get X number of networks or Y number of hosts. Start by working out the closest match you can from the numbers 2 , 4 , 8 , 16 , 32 , 64 , 128 , 256. If you cant get an exact match go up to the next highest. (in the cast of hosts remember to add 2 t accommodate the network can broadcast address). Once you make your decision simply convert that number to binary. And the number of binary bits that produces is the number you need to “borrow”, from the left for network and from the right for hosts.

Below is a list of all the subnets that can be created from a class C and B network. I find these are the most common you need and this can be hand to have above your desk for quick reference.
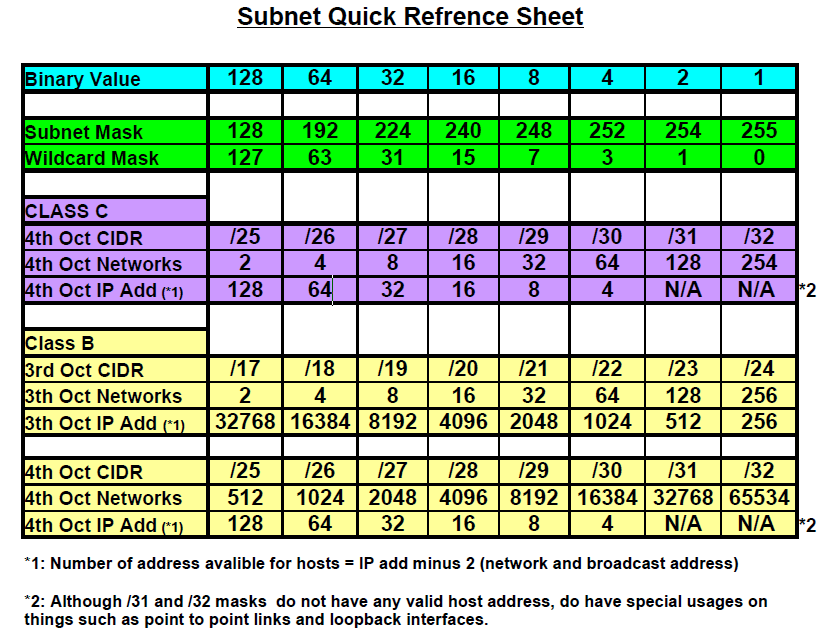
Sub-netting made easy

Above Sheet in PDF Format

Well  I hope that helps some people, and next its on with EIGRP.

DevilWAH