Running Unbuntu as a Diskless system.

Full Instructions from Unbuntu

Well the first question you might ask is why?

  1.  Allows you to boot a system to a second OS leaving the host hard drive untouched, this is similar to a duel boot but rather than having to set up duel boot on every device, you only need them all to have network boot enabled, and can manage the rest from a central server.
  2. Allows several hosts to boot from the same file system, very useful for some thing like “folding at home” where you might want to uses the resources of a users PC when they are away (out of hours) but do not want to have to install on to there profiles/OS. Changing the single file system updates every machine.
  3. You can build up mutiply images on the server, each streamlined for a specific job, and simply chose which one to boot to ad-hoc.

In my case I have used this for two purposes, first to run a computer cluster for disease modelling using a system called Condor, booting 16-20 users desktops to a single network image and using them to run models of disease spread for scientific papers.

And now more recently I have used the same principle for creating a GNS3 lab. I have several old laptops, as well as wife’s PC and even an old server. While at work I have access to servers and other lab equipment. I am not able to install Dynamips (GNS3’s back end), on to them all, and even if I could GNS3 runs far more stable on Linux than windows and I can’t guarantee other people will not uninstall or do any thing else that would stop it working.

The basic steps are to install Linux to a single machine, after which you copy this FS to your Server. (you need a server that supports PXE booting, TFTPD, NFS, and DHCP with PXE support)

And second set up your DHCP server to pass the name of the tftp serve along with the location on this server for a boot file.

Now there are more steps and the walk through above is a complete detailed process to get it up and running. If you have a few old boxes around you don’t know what to do with it fun to play with.  And will really help you learn the Linux FS.

DevilWAH


A Bit More Linux Stuff

While my CCNP studies are going well, this last week I have been setting up some more linux webservers at work, and I came across two issues. Both with simple solutions.

First was installing a SMTP relay server inside the network so websites (such as this one) can send admin  emails. Before I had been using an external smtp server, in the case of this site it was google mail, and while this is great for a single personal site it is not really the way you want to have it set up. One of the main resons of course is that by having your own internal mail server, only that one machine needs to connect to the outside.

It is actualy very easy to set this up, simply installing postfix, giving it a very basic set up. Using unbuntu and aptitude there is even a simple walk through script to get these configurations in.  Below is the default config you need to set up.

myhostname = host.domain.com
alias_maps = hash:/etc/aliases
alias_database = hash:/etc/aliases
myorigin = /etc/mailname
mydestination = domain1.com, domin2.com, localhost
relayhost =
mynetworks = 127.0.0.0/8 [::ffff:127.0.0.0]/104 [::1]/128 192.168.0.0/24 172.16.0.0/16
mailbox_size_limit = 050000000
recipient_delimiter = +
inet_interfaces = all
inet_protocols = all

The important one is “mynetworks = …….”

This is telling postfix that it should act as a rely from any host in these ranges that tries to use it to send mail thought it. But once you have the set up above and as long as the servers are in the ip ranges configured then you are good to go.

Just note a few things! First this is not the most secure set up, any device in the ranges can now send internet mail, this could end up a potential method of attack where malicious software attempts to send spam. Either be very care full in securing what devices can use the relay server or else think about using authentication to secure it.
Secondly if you do not have a static IP, and your mail server does not have a correct public DNS record set up, you may find some companies will refuse to accept mail from it. This is quite a standard way to prevent them getting hit by spam (Zombi clients infected with malware generally don’t have DNS records set up, company mail servers do). So if you expect to be sending lots of mail to a wide variety of internet address so make sure you sort this out.

My next step in this is to extend postfix to not only be a relay for my webservers but to become a full blown email server that revives internet mail for my domains.

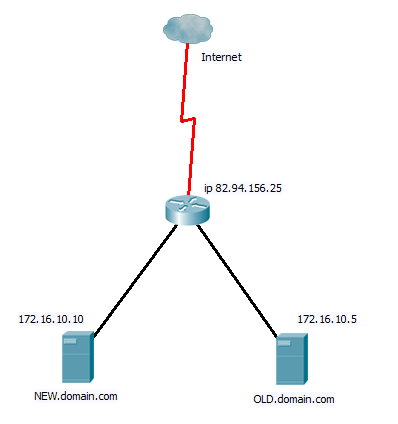
The other thing I came across was mod_proxy and mod_proxy_http, A while ago before I knew what I was doing I set up some websites on a server. Now looking back I realise that my first attempt was poor and I need to build a new server up and move the sites over. But with only one external IP to play with and multiply sites there is an issue of trying to keep every thing live and working during this process. The network looks something like below.

And on the old server I have the following virtual host file.

<VirtualHost * >
ServerName  site1.domain.com
# Indexes + Directory Root.
#DirectoryIndex index.html
DocumentRoot /var/XXX/
<Directory /var/XXX/>
Options Indexes FollowSymLinks MultiViews
Options -Indexes
AllowOverride FileInfo
Order allow,deny
allow from all
</Directory>
</VirtualHost>

<VirtualHost * >
ServerName  site2.domain.com
# Indexes + Directory Root.
#DirectoryIndex index.html
DocumentRoot /var/WWW/
<Directory /var/WWW/>
Options Indexes FollowSymLinks MultiViews
Options -Indexes
AllowOverride FileInfo
Order allow,deny
allow from all
</Directory>
</VirtualHost>

So I set the first website up on my new server, but only having one external IP address, I can’t then easily forward external traffic to the new server. NAT/PAT wont work as all traffic is coming in on port 80. However the solution with mod_porxy_http is simple. Once I have set up the site on the new server and configured a virtual host for it. I can then update the virtual host file on the old server for the moved site to contain this entry.

<NameVirtualHost *
<VirtualHost *>
ServerName site1.domain.com
ProxyRequests Off
<Proxy *>
Order deny,allow
Allow from all
</Proxy>
ProxyPass / http://NEW.domain.com/
ProxyPassReverse / http://NEW.domain.com/
</VirtualHost>

Now although the requests are still coming in to the old server it is simply passing them to the new server and relaying the replies back. We can carry on moving each site over in turn until all the old server is doing, is acting as a proxy for all the site that are now running on the new server. We can then update the NAT/PAT if we wish to point directly to the new server and decommission the old server.

Another reason you might want to employ Mod_proxy is if you have several  heavily utilised sites that you want to run on separate hardware, but like this example you only have one public IP address. Having one physical box acting as a proxy server, you can farm out the requests to as many physical boxes as you wish. Taking this further and implementing the server load balancing that comes on many CISCO routers, along with a couple of low spec front end servers acting as proxy to your web-servers behind you can achieve, redundant, load balancing at low cost.

I have often found that set-ups that cost many 10’s thousands, can be emulated with hardware that is often already on site, and a little careful thought.

But that’s been my week so far, fun stuff 🙂

DevilWAH

SDM in LINUX (Wine)

OK leaving CCNP SWITCH aside for a bit, I finely got around to setting up Linux to allow me to run SDM.

I should point out that I am not a great fan of SDM, but I do run the IOS based firewall on one of my small networks. And while I am happy to change the config of policy’s from the command line, it can be hard to visualise what is going on in 600+ lines of code. So I do fall back to it every now and then.

On the above network I have 100% Linux machines, which included those sitting in the management subnet. So up utill now if I wanted to run SDM I had to get out a windows laptop and plug it in, so for a while I have been looking how I could get this up and running.

There is no Linux SDM version but you can install SDM either on the PC or on the router.According to CISCO as long as the web browser has jarva script enabled, then if you use the version installed on the Router it will work. However despite 2 different versions of Firefox, Google Crome, and numerous attempts with Java versions. Trying this way would always hang at the same point on all three of the PC’s I tried it from. I also don’t really like the idea of running SDM from the router, it takes up space and resources and is another thing to go wrong.

So the alternative was to attempt to run SDM from with in Linux. You will read on the web that CISCO SDM is a Java based html applications, and so in theory you can simple copy the install file across from windows to Linux, move a few files around, and then open up your web browser and point it to the “launcher.html” file you will find in the install directory. However my attempt at this again proved unsuccessful. (I am not sure if this was due to the incorrect Java version I did try with a few but SDM is very fussy with Java and Linux is not so happy with multiply Java versions. (see here for instruction s for this method)

So I decided to go the whole hog and experiment with WINE. Wine for those of you who don’t know is a platform that allows you to run native windows application with in LINUX, I like to think of it as a windows emulator, however some purists will tell you this is not quite correct. But what ever it will allow you to run many windows application on LINUX, and while some people may rebel at the idea of that, I am more of the opinion if it works and gets the job done, then I don’t really have a problem.

So setting it all up.

The first thing to do is add the wine repository ( ppa:ubuntu-wine/ppa) to you distribution. In Unbuntu this can either be done using the option settings in the graphical package manager software, or by running the following command.

sudo add-apt-repository ppa:ubuntu-wine/ppa

Then update the repository cache, (“sudo apt-get update” from the command line).

If you are running the GUI package manager, search for wine and tick the wine1.2 install (at time of writing this is the current stable version, you should pick the latest stable). or from the cli type

sudo apt-get install wine1.2

Wine will now be installed.

You now need to get hold of CISCO SDM, Firefox 3.5 (must be 3.5 this will not work with version 3.6 due to java issues), and a copy of JAVA 6 update 11 (make sure it is this exact version SDM is very very picky).

Once you have downloaded them all, you can simple open them in the GUI, you may get an error saying that they are not executable files. Linux by default will not allow a file to be executed unless it has been set to be allowed. If you get this message simple right click, go to the properties and tick the execute box under the permissions tab. You can also run “sudo chmod +x <filename>” to achieve the same.

You should not be able to run the setup and follow the install exactly as you would under windows. Once you have installed all three, check you can open Firefox. You can find this either up in the application menu under

Wine >> wine applications >> firefox

Or you should have an short cut on the desk top (you may need to make this short cut executable like above).

You will also have a SDM shortcut on the desktop, however this will bring up the WINE IE browser which does not work, so you can’t use this direct.

Instead open up the Firefox you have just installed, and in the address bar type “c:” and hit “return” / click go. This will bring up a folder list for the Wine created windows file system. Open  “programs files” >> cisco systems >> SDM >> common files >> common files. Here you will find a file called Launcher.html which you want to open (I would also suggest add this as a short cut)

And there you are, CISCO SDM will now function as in windows, pop up boxes and all. You can even create a desktop icon that will pass the file above to Firefox if you wish.

Hope that’s of some help to people. If I get it running completely native with out the need for WINE I will be sure to let you know.

DevilWAH

Do you like the Pretty links?

Getting the pretty Permalink’s to work on this blog has been a bit of a pain, According to word press you click on the format you want under the settings and then they should all work nicely.

so rather than have a link that looks like

“http://www.devilwah.com/?p=344”

you can have the same link looking like

“http://www.devilwah.com/2010/09/minority-report-the-reality/”

Pretty 🙂 right.. 😉

So how did I get it all up and running?

I found out when first trying to activate it that I came across a “page not found error” suggesting that the mod_rewrite module in Apache was not running correctly. And after lots of searching around I found it this is to do with the “Allowoveride” directive in Apache.

The default setting for the directive in the virtual site file in Unbuntu is,

<Directory />
Options FollowSymLinks
AllowOverride None
</Directory>

Further reading suggests that with this set to none, the .htaccess file that is needed for  mod_rewrite to be able to work will not be used.

Searching the net lots of people suggest changing this to “Allowoverride All”, which after a restart of Apache will work fine. But for a little more security I found “Allowoverride FileInfo” will achieve the same thing.

And that’s it, one little word change is the difference between it all working fine and page not found!

The same can be achieved by editing the httpd.conf and associated config files, but as I use virtual sites I prefer editing these directly.

Thank fully the old style links still work just find, the mod_rewrite simple takes the pretty version of the link and translates it back to the ugly version behind the scene. Leaving you the user with a more pleasurable browsing experience.  🙂

DevilWAH

JAVA versions in Linux.

I am still quite a newbie when it comes to Linux, and have a long way to go yet before I could be considered an expert. But slowly I am getting there.

Today to help with setting up the firewall to allow email, I thought it was time I finally got around to installing Java on this PC, and because CISCO SDM express requires an old version this means setting up multiply versions.

Installing the first one is simple enough

$sudo apt-get install java….

(you can do an
$apt-get update
followed by
$apt-cache search java
and this will show you what versions are available for download.)

and after a bit of poking around the second one was simple enough as well, download the bin file from www.JAVA.com and extract it to a directory (this can be any where you want, although the /opt/ one seems to be a common choice) as below. If you want more instructions just click on the instruction link on the site.

$sudo sh ./java-5-4…..

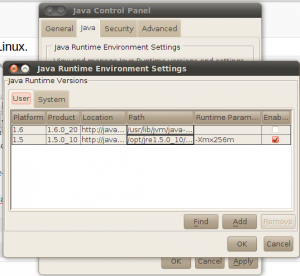
Then cheat and open the java desktop control panel open up the runtime environment settings and add in you new version. (if any Linux masters wan’t to post the guru way to do this please do 🙂 )

And there you have it multiply JAVA installs.

Only one issues now though, Firefox does not support Java below version 6-10, and SDM still does not work! So its on to the next method to get SDM working on Linux.

I will get this email working soon…

Take care all.